Android User Guide
For SplashID Safe (version 8) applications Download PDF version
Introduction
SplashID Safe provides quick and easy access to all of your personal identification information, including usernames, passwords, credit cards, PINs, calling card numbers, frequent flyer numbers, insurance info, and more. Data is stored in a secure, encrypted, password protected format and can be synchronized between SplashID Safe on your mobile device and SplashID Safe on the desktop (Windows, Mac OS, and web). You may prefer to do most of your data entry on the desktop, however, since it's faster and easier with a keyboard, and then synchronize the data with your mobile.
Account Types
SplashID Safe is the only password manager that lets the user choose how to handle the storage of their sensitive records securely. You can choose between Cloud sync, local WiFi sync, or No sync based on your needs.
SplashID Cloud Services
SplashID Cloud Services provides seamless automatic sync across all your computers and devices via our secure cloud server: anywhere, anytime. It's the quintessential "set it and forget it" sync solution for secure data.
In addition to automatic sync, the optional SplashID Cloud Services also includes a powerful web-based version of SplashID Safe, professional email support, and automated cloud backups.
Local Wi-Fi Sync Only
This is the familiar WiFi sync solution that has been in SplashID since version 4. You can manually connect and sync SplashID on the mobile device with the PC or macOS desktop SplashID over your local WiFi network.
No Sync Enabled
This option exists for those users who don't plan on synchronizing their SplashID Safe data. Your data will exist only in the local database on the device, and will not be automatically backed up in the cloud or synchronized with any desktop or web app.
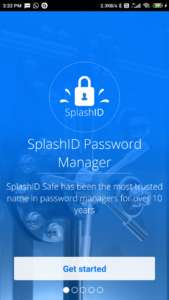
First Time Set Up
After SplashID is installed on your device and launched, it will need to be set up. The set up is very easy and follows a few steps to get you to start using SplashID.
After you enter your email address, SplashID will check with the server if the email address is registered. If the SplashID account exists, then it will ask you to enter your master password to complete the initial set up.
On the other hand, if the email isn't found in the SplashID system, then you will be prompted to continue with registering a new SplashID account. The next section will explain the required steps needed for the registration.
Registration
Launch SplashID on your phone and enter your email address to start creating your account. It is recommended that you use all lower case letters in your email address to prevent any confusion with your account email address. The screenshots below will show you the steps required to complete the registration process.
- Launch screen
- Email address entry
- EU user opt in
- EU user options
- Master password and password hint setup


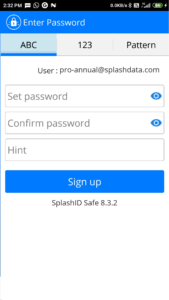
After the master password and hint is accepted by the server, you will need to verify your email to activate your account. Please check your email inbox and click on the verification link to complete the user account setup.
Alternatively, you can choose to sign up for a new SplashID account on our website at https://www.splashid.com/register.
Once you create a SplashID account you can use the same account for access on all your devices and desktops. A SplashID Pro license will be required if you need to access it across unlimited devices and desktops. Please visit https://www.splashid.com/pro to get a SplashID Pro license.
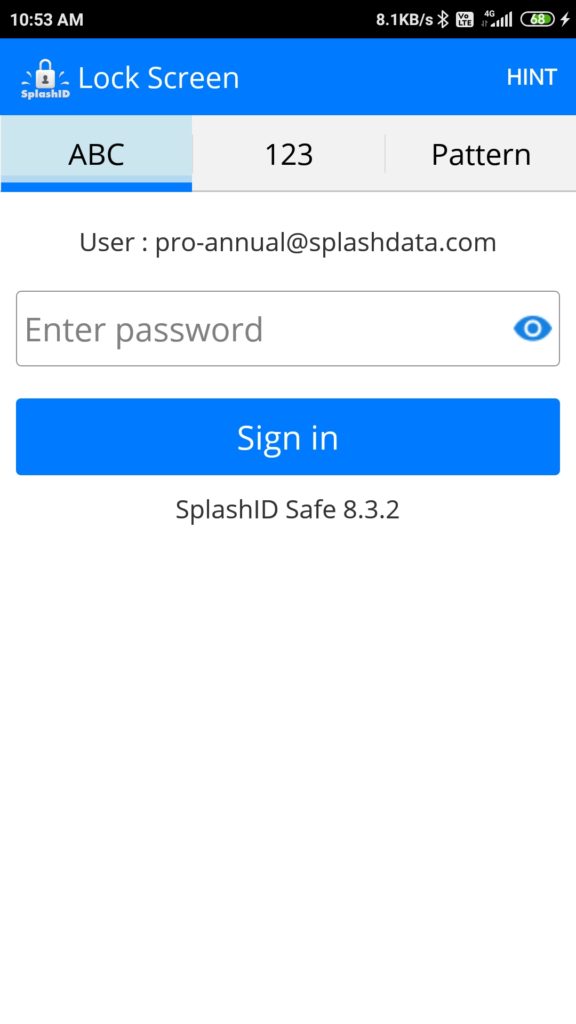
Login
You have the option to choose how you want to login to SplashID on your Android device. Use your strong master password to sign in to the application for the first time after installing the app. Once set up, the master password is used to access your account and unlock the application.
- Master password
- Fingerprint
- Numeric passcode
- Pattern unlock
If activation is not completed then you will get a prompt indicating that you need to complete the activation.
Cloud sync users can also access their records in their SplashID account on our website at https://www.splashid.com/login.
Fingerprint sign in and unlock
If your device supports fingerprint recognition then you can enable it for use in SplashID. Once enabled, you can use it for signing in to your app or to unlock it.
Fingerprint access will work if the following requirements are met on your device.
- Android Marshmallow (6.0 or above)
- The device should have fingerprint hardware capability
- You should have at least one fingerprint enrolled on your device
To set up fingerprint access do the following.
- Sign in to SplashID
- Go to Settings > Security Settings
- Tap the switch for Fingerprint to enable or disable it
After enabling Fingerprint in SplashID you will see the screen shown below whenever you need to sign in or unlock the app. You can also use the master password method, if you desire, by tapping on the Unlock using password button shown on this screen.

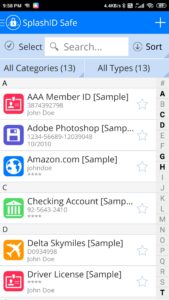
Record List
The record list is your main view for SplashID Safe. From here you will browse, search, add, edit, and view records.
Starting from the top left, here are the functions of the Record List:
- Side menu button - Access Dashboard, Backup, Settings, and Help.
- Alphabetical Search Bar - This bar allows you to quickly move to the desired alphabetical group. This option is only available when sorting by Name.
- Add button - Add a new record, new type, or new category
- Category and Type filters - Select a Category or Type to filter by
- Filter local only records - This option is available under the All Categories dropdown. When you select this option, the record list will show the local only records in your app.
- Mark a record as a favorite - This feature will allow you to make any record as a favorite.
- Recently Added - This option is available under Sort. This feature is useful to see all the records that are recently added.
- Recently Viewed - This option is available under Sort. This feature is useful to see all the records that are recently Viewed.
- Select - Brings up an action bar on the bottom of the screen so you can select multiple records to Share, Duplicate, Move, or Delete
- Search - Search on any field with dynamic results
- Sort - Change the view to sort by Name, Category, Type, Date, or Most Visited
Record Details
When you tap on a record in the Record List, it opens the Record Details screen. We've designed this screen to give you everything you need on one level so you don't have to drill down to make changes.
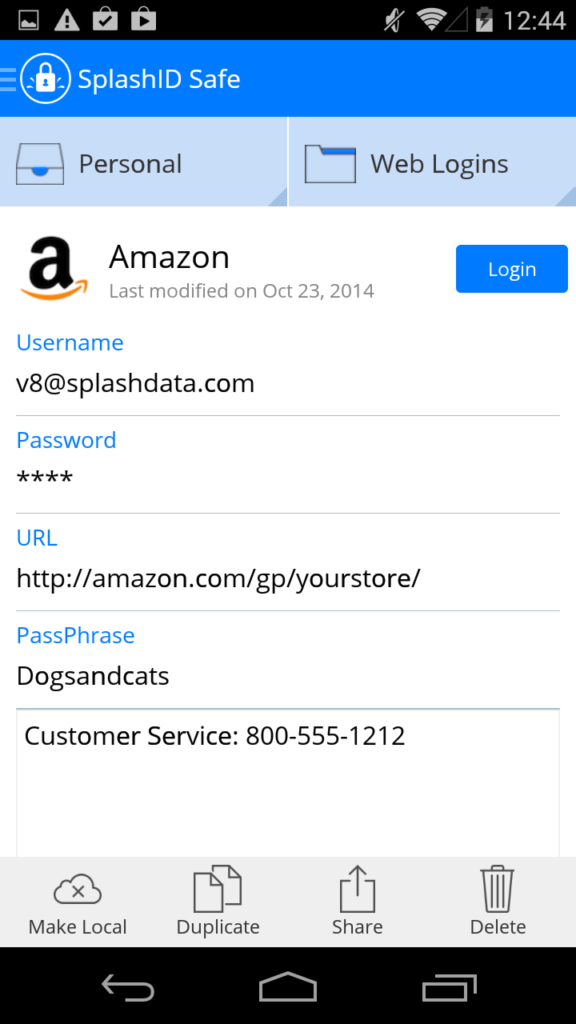
Tap a field to access tools, such as Edit, Copy, Generate (password), and Mask. You can set password generator settings in the main Settings screen. If you want to add additional fields, tap an existing field, then tap Edit, then you can enter data on the extra fields or add attachments.
A Custom Icon can be set for a record if you desire to have one. This is available since SplashID 8.3.0. To set a custom icon you can tap on the icon next to the record name, tap on the '+' button on the top right of the icon selection, and then select an image from the Gallery or capture a new one with the phone camera. This feature will require you to accept the Camera permission on your phone for SplashID. The selected or captured image will be displayed with an option to choose a specific region to be set as the icon.
Tap the Login button next to the record name to open the browser and autofill the username and password. You can also turn on Auto-Submit in Settings. This feature will work only if the record is of the default Web Login type provided by SplashID. If the Web Login type was deleted or the record was customized then this won't be available.
Make Local will designate any record in your SplashID database as Local only. This means the record stays local on the device and does not sync to the cloud server. If the record is already on the web app or on any other devices running SplashID, it will get deleted from those apps. At any point, you can set the record back to sync with the cloud. The record would then sync back to the cloud server and appear on all devices.
Duplicate will make a copy of the current record so you can edit it and save it as a new record.
Share will send the record as a secure file for SplashID users or a limited use self-destructing web page for non-SplashID users.
Delete will delete the current record.
Credit Card Scanner allows you to scan an embossed credit card for a record of type Credit Card. This will reduce any human errors while creating Credit Card record.
Editing Records
While viewing a record, tap a field and then the Edit button to make changes. This is also what you see when you tap the New Record button from the Record List. We've designed this screen to give you everything you need on one level so you don't have to drill down to make changes.
Tap the Category or Type menus to change the assigned category or type.
Tap the Icon to access the icon picker and make a new selection. This may not be necessary, however, as many logos are automatically assigned after you enter the record name. For example, type "Amazon" for the record name and the Amazon logo shows up when go to the next field or save.
Tap the field in the data data space or the field label to edit directly.
Tap the Notes field to add notes up to 4000 characters.
Tap the Add Attachment button to add a photo or document (up to 1 MB).

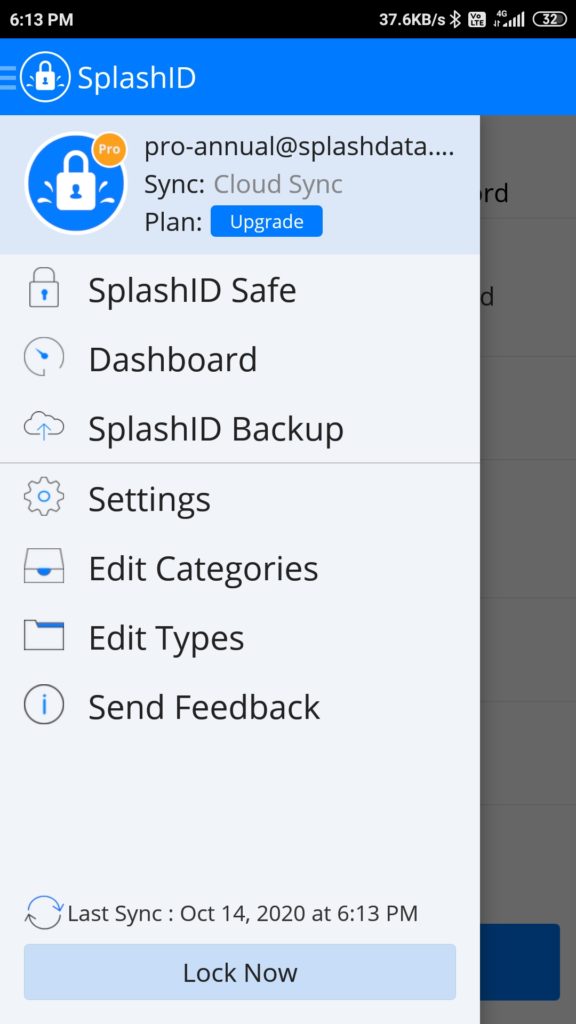
Side Menu
When you tap the side menu button at the top left of your screen, from any view, you can access the following options:
- SplashID Safe - This is the Record List, where you search, view, and edit your secure records.
- Dashboard - Access the Dashboard, where you can analyze your records and improve your security.
- SplashID Backup - Cloud sync users will be able to access and restore online backups on those rainy days.
- Settings - Access all the SplashID Settings. See the next section for details.
- Edit Categories - Displays the Categories which you may edit or delete. Select an existing type and tap edit, or tap New to create a new one.
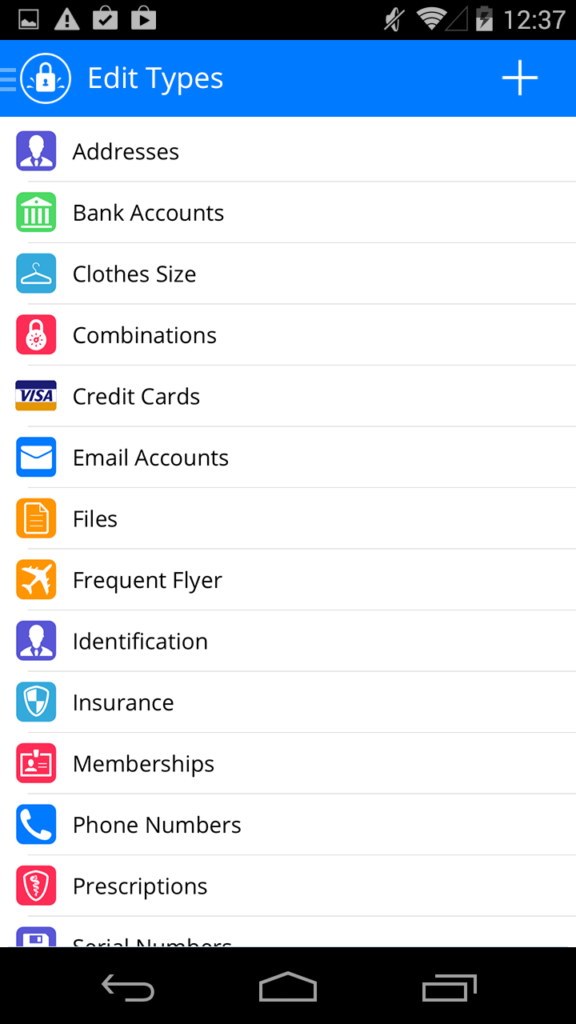
- Edit Types - Displays the Types which you may edit or delete. Select an existing type and tap edit, or tap New to create a new one.
- Get Help - Access the SplashData Help Desk at support.splashdata.com.
- Lock Now - Locks and encrypts the SplashID database.
Types & Categories
The difference between Categories and Types is best illustrated by an example. You use Categories to separate your Business records from your Personal records, while you use Types to separate your Credit Card records from your Web Login records.
Categories act as filters for grouping related records. The two predefined Categories are Business and Personal, though you may add more by choosing Edit Categories from the side menu.
Types act as templates, which define the structure for the items you want to store in SplashID. You may define up to 9 Custom field labels and a default icon for each type, as well as specify the fields you wish to mask. For example, you may create a type for Web Logins, which includes Custom field labels for username, password, and URL, with a globe icon, and the password field masked; and you may create a Type for Credit Cards which includes Custom field labels for the credit card number, expiration date, and PIN, with a Visa icon, and the credit card number and PIN masked.
Settings
Settings allow you to customize SplashID to fit your needs and to maintain your SplashID account. The sections below give a brief description of the available settings.
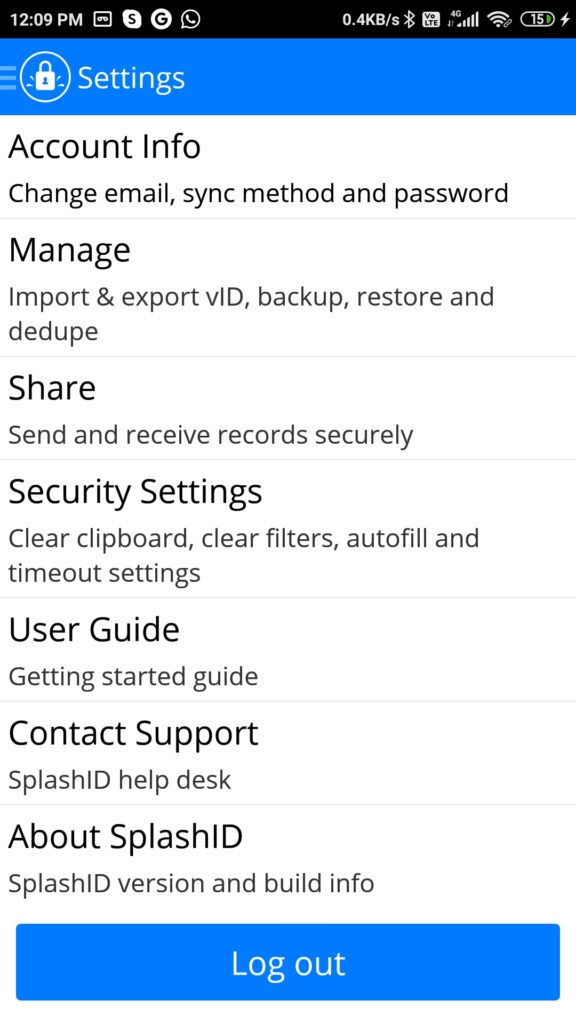
The Log out button on the main settings screen is available for Cloud sync users to exit their account on the device, and clean the local database of any of their previously used information. This option is not available for WiFi sync or No sync users as a precautionary measure against the inadvertent deletion of their data due to the use of this option.
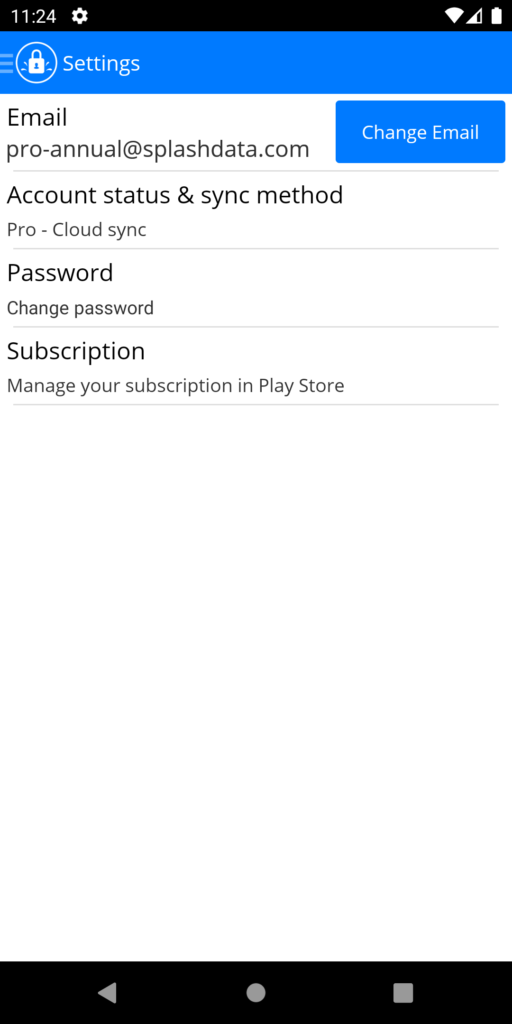
Account Info
- Email - This email address needs to be valid and the same on every version of SplashID Safe you use.
- Change Email - Tap to change the email address associated with your SplashID account. After, a change you will need to verify the email address by clicking on a link in the verification email sent to the new address.
- Account status & sync method - View your account status and switch to a different sync solution.
- Password - Select to edit the master password protecting SplashID. See Security for more info.
- Subscription - If you have purchased a SplashID subscription from the Android Play Store, then you can access your subscription in the Play Store using this option.
Manage
- Import vID from Mass Storage or Dropbox -- If you have the Dropbox app installed, import a backup of all your records from a secure vID file (protected by your master password) from your Dropbox folder under Apps/SplashID/
- Import SVID from Mass Storage or Dropbox -- SVID is an enhanced version of VID that supports user uploaded icons and enhanced processing of records during their import. If you have the Dropbox app installed, import a backup of all your records from a secure SVID file (protected by your master password) from your Dropbox folder under Apps/SplashID/
- Export vID to Mass Storage Dropbox -- If you have the Dropbox app installed, you can export a backup of all your records to a secure vID file (protected by your master password) to your Dropbox folder under Apps/SplashID/
- Export SVID to Mass Storage Dropbox -- SVID is an enhanced version of VID that supports user uploaded icons and enhanced processing of records during their import. If you have the Dropbox app installed, you can export a backup of all your records to a secure SVID file (protected by your master password) to your Dropbox folder under Apps/SplashID/
- Export CSV - If you don’t want to use Dropbox to export a backup of all your records, this option is for you to export records to CSV file.
- Delete - Deletes all records in the database, in case you wish to start fresh.
- Backup - This will make a full backup of your encrypted SplashID database on your SD card. This way you can restore the database later if you delete and reinstall SplashID, have data loss, or if you change devices.
- Restore - Restores a backup from your SD card. Please note that the password on your database will be replaced with the password you set at the time of the backup.
- Dedupe Records - Checks for duplicate records in your database. If any are found, tap the menu button, then select Delete Duplicates. Duplicates are only identified if all field data matches exactly between 2 different records.
- Font - This feature will allow you to choose a different font for the app.
- Sync Custom Icons - This feature allows you to synchronize icons uploaded by you between the device and your cloud account. This is is only available for a user using cloud sync.
- Restore default Categories and Types - This feature is only available for WiFi Sync and No Sync user to restore deleted or updated default types and categories.
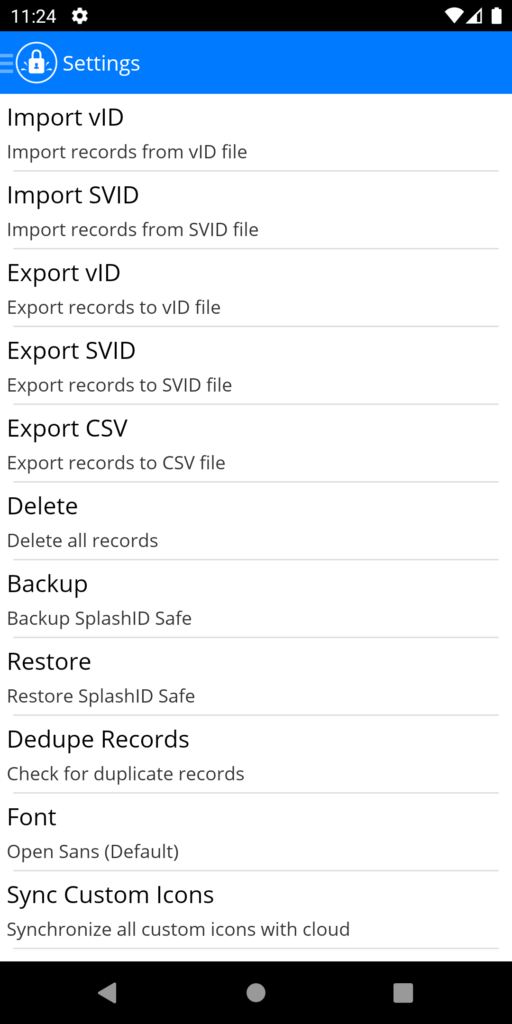
Use SVID instead of vID
SVID files support user uploaded icons on records and has enhanced user information to allow for updating the records during an import. You can manually export and import SVID files. It is recommended that you use SVID files instead of vID files during the manual export and import of records.
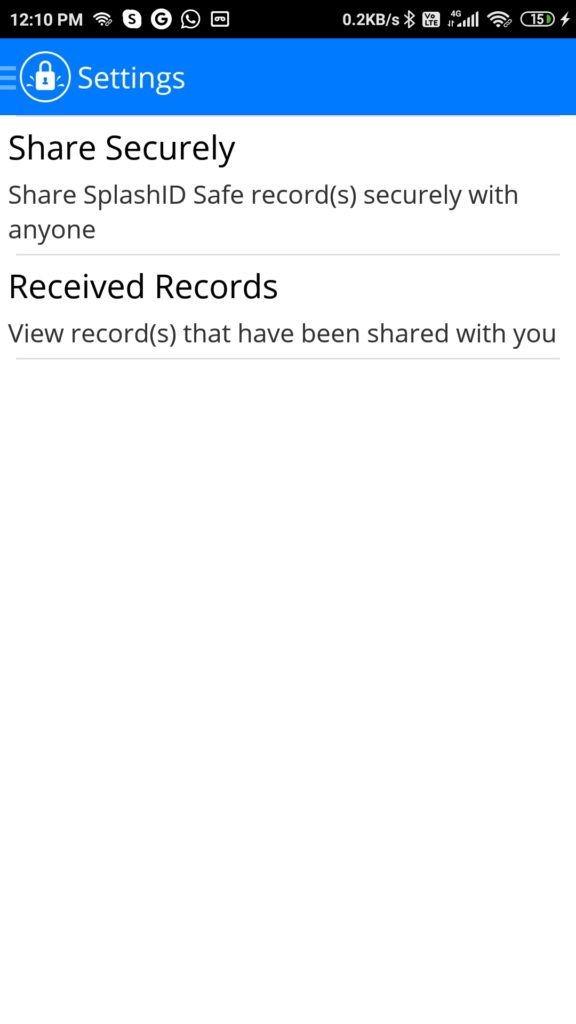
Share
- Share Securely - Use this tool to send multiple records or all of them as a secure file for SplashID users or a limited use self-destructing web page for non-SplashID users.
- Received records - Here you will find records that other users have Shared Securely with you.
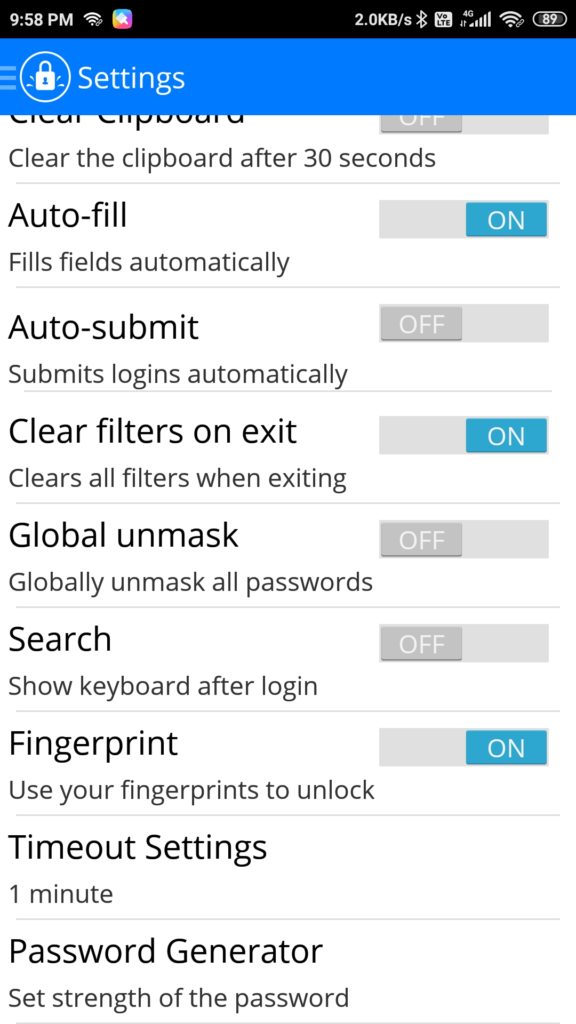
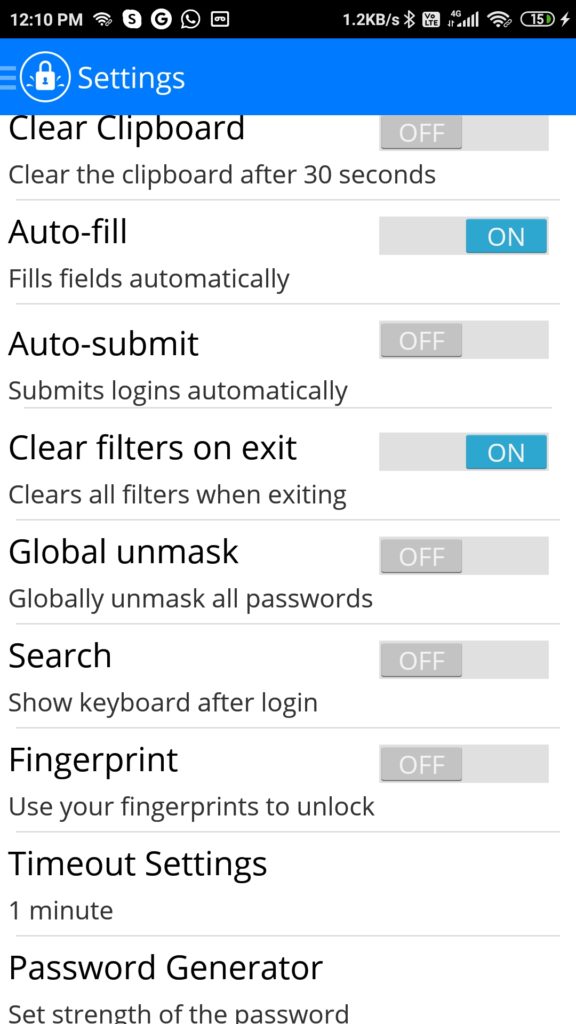
Security
- Clear Clipboard - Set the app to clear the clipboard after 30 seconds of copying any value from SplashID.
- Auto-fill - Fill in username and password fields automatically in the built-in browser.
- Auto-submit - Automatically submit the login form after auto-fill on the built-in browser. This option is available only if you have enabled the Auto-fill functionality.
- Clear Filters on Exit - This preference, when enabled, will reset the Category and Type filter selections when you exit the application, so when you return all items will be displayed.
- Global Unmask - This option allows you to unmask all the masked fields of all the records at once.
- Search - Set the option to show an open keyboard immediately after signing in to the app.
- Fingerprint - Set the option to use your fingerprint to sign in and unlock SplashID.
- Timeout Settings - Change your auto-locking timeout period: Immediately up to 10 minutes.
- Password Generator - Change settings for password generator - length and included characters.
About SplashID
Displays the version info.
Security
Setting a Password - You must set a password to protect your data.
Do not forget your master password
You will need to use this master password to open SplashID on all the platforms you have SplashID - desktop, mobile apps, or the web app if using Cloud sync.
We cannot change or reset your master password from our side. So please do anything required to not forget your master password.
- Your password must be at least 4 characters in length.
- This password is case sensitive.
- A strong password of at least 8 characters including at least one number, one upper case character, and one non-alphanumeric character is strongly recommended.
- Once you set a password, SplashID encrypts your data using 256-bit Blowfish encryption to ensure data security.
- You can optionally enter a hint to remind you of your password if you forget.
Setting a Pattern - A more fun and convenient way to login, though less secure than a strong password, is using a pattern. To set a pattern, tap the Pattern button in the Set Password dialog. Then draw your pattern using the numbered dots supplied (no overlapping or repeating). Tap Continue and confirm the pattern, then make a note of the numeric equivalent - this must match the SplashID desktop if you plan on synchronising. Please note you can not use both a pattern and text password, it is always one or the other.
Entering a Password - You will be required to enter your password each time you launch SplashID, or when you turn on your handheld if SplashID was last running when it was turned off.
Changing a Password - To change a password, select Set Password from the Settings screen, enter your Old Password, then enter and confirm the New Password.
2-Factor Authentication - 2-factor Authentication is a recommended option to increase the security of your SplashID account. The 2nd factor is an additional code that needs to be entered when your SplashID account is accessed from a new desktop, device, or browser. Once you confirm access is authorized with the additional code, you will no longer need to enter the 2nd-factor code when you log in from that device or browser. This works only for Cloud Sync users.
Setting up 2-Factor Authentication
To use 2-Factor Authentication, login to your SplashID account at https://www.splashid.com/login using the Web client. Under Settings > 2-factor authentication, select 'Enable 2-Factor Authentication' and click on Save. Once enabled, if you attempt to log in to your SplashID account from a new web browser, desktop, tablet, or phone, you will be required to enter a 6-digit code that is emailed to your SplashID account email address or sent by SMS to your phone number. Once you enter the second-factor code, you will never be asked for the code again on that browser or device. If you want to authorize access on another new web browser or device, you will need another second-factor authorization code.
Sharing Records
When viewing the Record Info, tap the menu button, then select Email vID. Then you have the option to set a password, which will encrypt the file and is recommended. Then you will be taken to a screen where you enter the recipient address, subject, and any message you wish to add. A SplashID vID file will be attached to the email containing the record data. It can only be imported into the SplashID Safe desktop or web applications.
Synchronization
You can start the sync process in 2 ways:
1. Tap and drag down on the record list to either start a cloud sync or initiate a WiFi sync
2. Tap the side menu button (top left) and tap the last sync button, bottom left
You have an important choice to make between local WiFi sync and SplashID Cloud Services. Here's how they are used:
SplashID Cloud Services
With version 7, we've introduced a new cloud syncing service that seamlessly updates any changes to your records when you launch the application. No more fussing with WiFi sync (unless you want to).
Here's the great thing about it - we don't have to explain how to use it. Just login to your various SplashID Safe versions (iPhone, iPad, Mac, Windows, Android, or the web app!) with the same email address, and your data synchronizes automatically. Never is it out of sync, never do you have to worry about the loss of data or backing up. It just works.
Local WiFi Sync Only
This is the familiar WiFi sync solution that has been in SplashID Safe since version 4. Manually connect the handheld and desktop apps over your local WiFi network.
Items may be created or edited on the Handheld or Desktop and the changes can be synchronized over your local WiFi network. You can download the SplashID Safe desktop for Mac or Windows from https://www.splashid.com/downloads.
By default, information is synchronized in both directions, but you can adjust the settings, in Sync settings which can be found in the Options/Preferences dialog.
In most cases, you will wish to leave the Default setting (on the right) set to Synchronize. This means that after changing it to Desktop Overwrites Handheld and performing a sync, it will revert back to Synchronize for the next sync so you don't have to go back in and change the setting back manually.
Here are the possible sync settings and the results they will bring about:
- Synchronize - Changes made on the Handheld or the Desktop will be synchronized. If a record is edited on both sides between syncs, the latest edit will win.
- Desktop overwrites handheld - All data on the Desktop is copied to the handheld. Any data on the Handheld will be replaced.
- Handheld overwrites Desktop - All data on the Handheld is copied to the Desktop. Any data on the Desktop will be replaced.
In order to synchronize, you must do the following:
- Turn on WiFi on your handheld device, then select the same network that your computer is on for your handheld to join
- Open the SplashID desktop
- Select the correct user from the User menu in the SplashID desktop to match the device name
- Set the passwords the same on both the desktop and handheld software
- Adjust the Sync settings in Options/Preferences > Sync if you wish
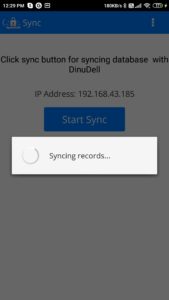
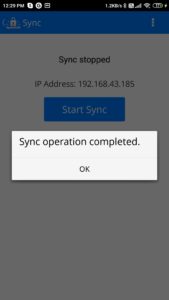
- Start the Sync on the handheld, by selecting Wi-Fi sync from the Settings screen
Refer to the screenshots below to see the WiFi sync steps.
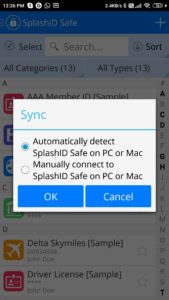
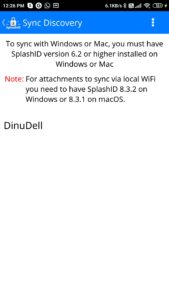
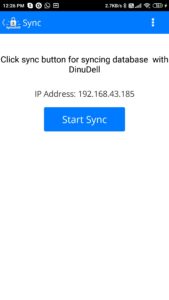
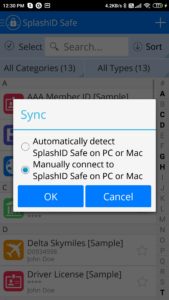
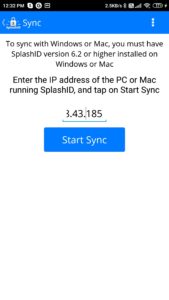
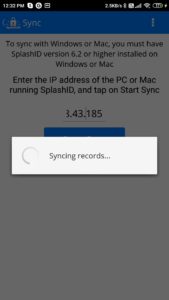
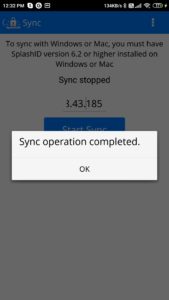
Manual IP Address Sync
If you have trouble connecting your mobile and desktop SplashID, you can sync using a manual IP address.
To do this, open the Sync dialog on the handheld and tap where it says Manually connect to SplashID Safe on PC or Mac.
Enter the IP address of the desktop computer, either on the local network or the public IP if connected directly to the Internet. You can find this IP address in the SplashID Desktop under Options/Preferences > Sync.
Refer to the screenshots given below to see the WiFi sync steps with manual IP address entry.
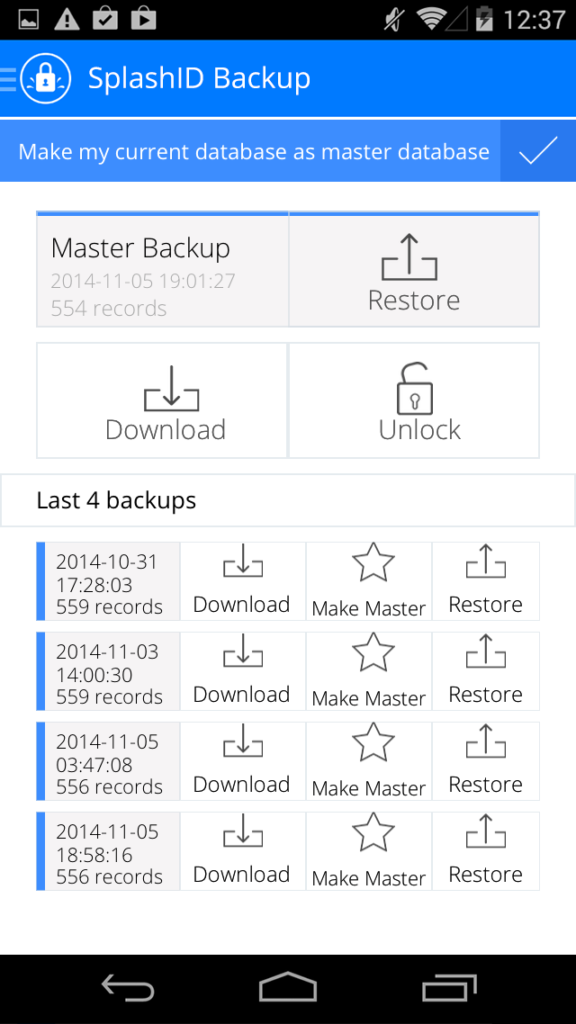
Backup & Restore
With SplashID 8, cloud sync users have a new backup service that protects them from data loss forever. Every week, a new encrypted backup is automatically created for you. Your 5 most recent backups are available anytime to download or restore as your current database. And you can lock in any backup (or your current database) as your master backup.
Hopefully you'll never need to use it, but if you do, here's how.
Login to any SplashID 8 client app - iOS, Android, Mac, or Windows - and select the SplashID Backup tab on the side menu.
To restore a backup, select the backup you would like to restore, based on the date and number of records it contains, then click Restore.
You can also make your current database the "master" backup by tapping the check mark at the top of the screen. The master never gets overwritten by newer backups, giving you a reliable restore point once you set it. If you want to release the master backup, click the Unlock button. Or you can just replace the current master backup with your current database at any time by tapping the check mark at the top of the screen.
Dashboard
It seems like every day you hear about a new hacking incident or data breach, and you know you should be combing through your SplashID records, changing your old or weak passwords, and of course making sure you're not using the same passwords on multiple sites. That's what you should be doing, but the task is too often put off since it can be time-consuming and overwhelming.
That's where our new dashboard comes in, constantly analyzing your SplashID records to identify old, weak, and reused passwords and enabling you to fix them with just a few clicks!
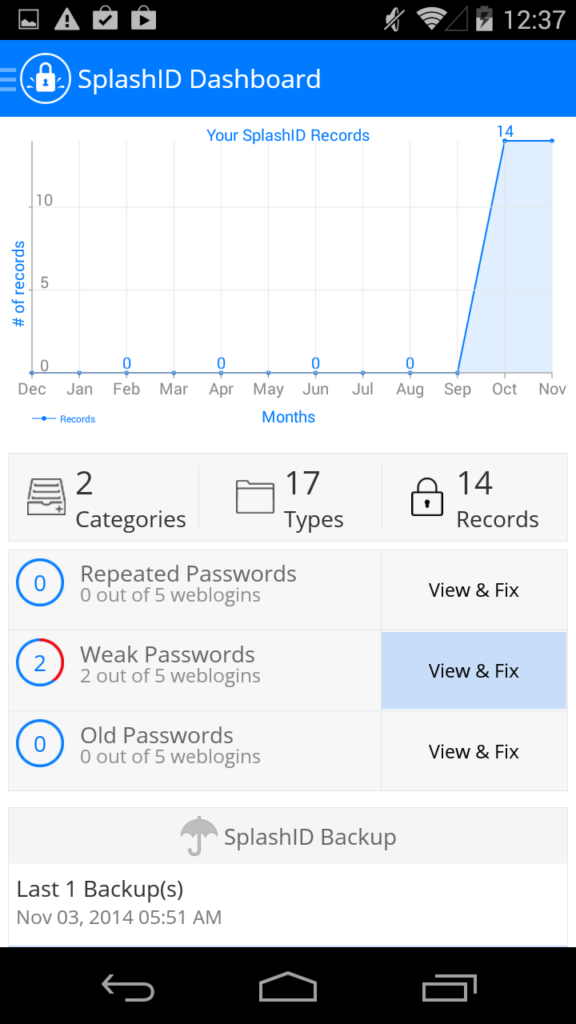
The graph shows you the overall growth of your SplashID database over time, and under that, you will find a table indicating the total number of categories, types, and records in your database.
Below that you will find an analysis of how many of your passwords are Repeated, Weak, or Old. The progress indicator to the left shows how much of your database contains these weaknesses (in red). Tap the View and Fix button to access a list of the records that contain these weaknesses. The idea is that you take on one of these weak records, generate a stronger password in SplashID, login into the website, and update your password on the website.
At the bottom of the Dashboard screen is a handy shortcut to the SplashID Backup feature.
To summarise the Dashboard provides you with the following options to secure your passwords.
- Repeated Passwords - This feature allows you to look for all the records that have the same passwords. Tap on this option and the app will list all the records with the same passwords.
- Weak Passwords - This feature allows you to look for all the weak passwords used in the records. Tap on this option and the app will list all the records with weak passwords.
- Old passwords - This feature allows you to look for all the records that have an old password. Tap on this option and the app will list all the records with old passwords.
- Automated Backup for cloud users - This feature allows cloud sync users to take a backup of all their records.
Other Features
- Hide content on the preview list - This feature will not show SplashID content when we see our app in the recent apps list.
- EU GDPR - EU GDPR consent is required to sign up for new EU users.
- Show/hide password - This is provided by the eye option to show or hide the passwords across all records.
- Offline Feature - This feature is available for WiFi and No Sync users with a Pro license. With this mode enabled you can see all your records in offline mode, without needing SplashID to communicate with our servers for account related services. In this mode SplashID will ask you for permission to connect to the cloud if you wish to share records, change your master password, or if your subscription expires.
Getting Support
SplashData offers technical support and other resources online. SplashID Safe support is customized to meet your needs. Please go to https://www.splashid.com/support to get help on an issue by our experts, or visit our support center at https://support.splashdata.com for useful information on commonly occurring issues that can be resolved by yourself.
You can view knowledge base articles, ask public questions, and contact customer support to get the answers you need.
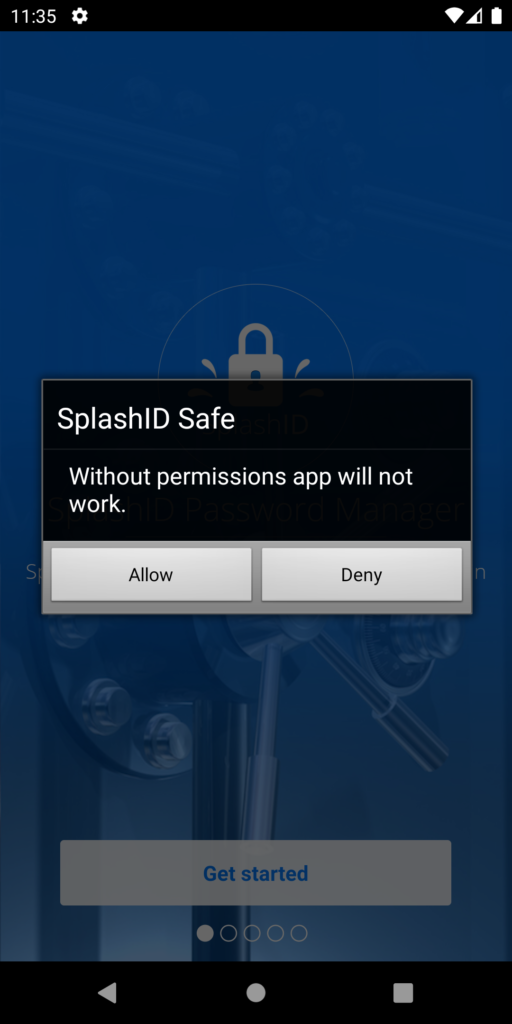
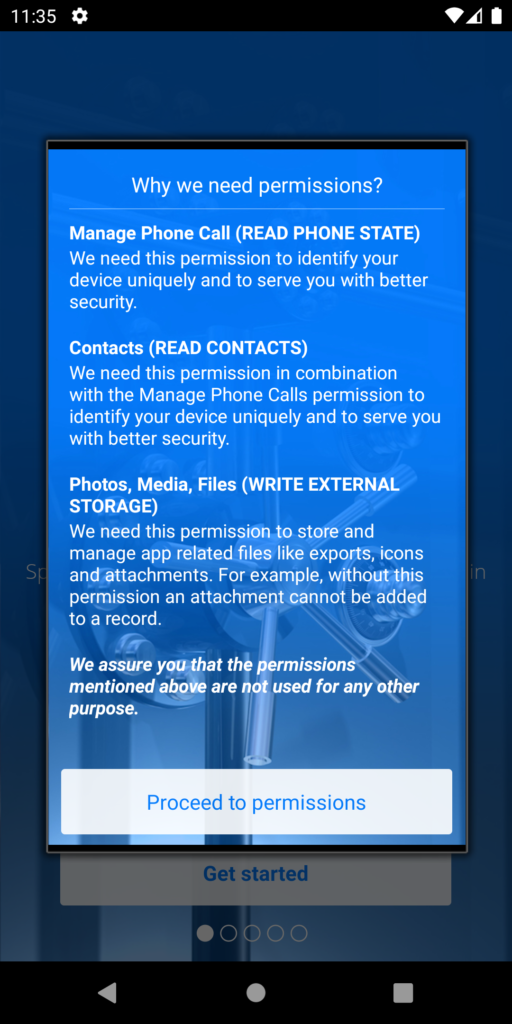
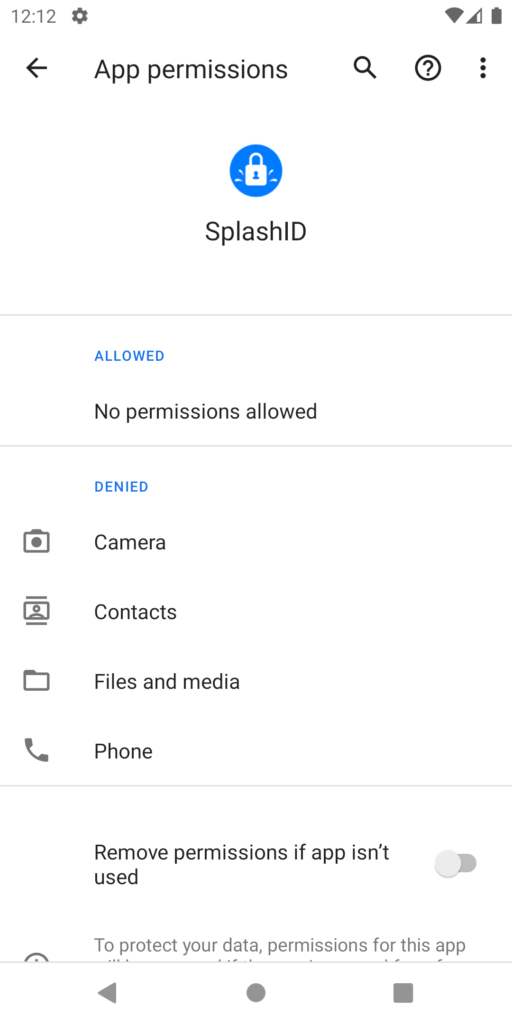
App Permissions
SplashID requires certain runtime permissions for the app to work as expected. You will need to grant the permissions for continued usage of the app. For the user's information we have provided two types of custom permission dialogs according to Google Play Store guidelines.
Deny required permissions without don’t ask again
This dialog comes when you deny the required permission without checking don’t ask again. SplashID will still have rights to show this OS generated permission dialog when required.
Deny required permissions with don’t ask again
This dialog comes when you deny the required permission by checking the don’t ask again option. This screen explains the reasons for SplashID needing these permissions in the app. This dialog is displayed when SplashID does not have the rights to show OS generated permission dialogs. You will then be taken to the app’s permission screen to allow permissions to be given.
App Updates
The Android app is available on Google Play Store. To update your app, please launch the Play Store app on your phone, locate SplashID, and update it.
We have also added In-App upgrade notifications since SplashID 8.3.1 to alert you on the existence of new versions of SplashID.
To study the release notes you can visit our page at https://www.splashid.com/release-notes.